X
Sorry...Pre-order has been closed.
Pre-order of Qmote has been closed since March 31st, 2016. We are currently working on the production of "Qmote S." Please stay tuned! We will be back with the exciting Qmote S soon!
Here you may sign up "Qblinks Update" to get our latest news!
Support
Here are some details about Qmote.
If you can't get the right answers, please find our support email address at the bottom of this page.
If you can't get the right answers, please find our support email address at the bottom of this page.


User Manual
Quick Start Guide

General Questions

How Qmote Works

Qmote Hardware

Qmote App
(iOS)
(iOS)

Qmote App
(Android)
(Android)

Troubleshooting

Qblinks Cloud

Compliance
User Manual
Download
English User Manual
here for offline reading.
Download
日本語 User Manual
here for offline reading.
Download
中文版 User Manual
here for offline reading.
Quick Start Guide
Qmote app is required as well as Bluetooth. When you click the remote it will send the command via Bluetooth to the app, thus allowing it to control connected services.


iOS
- Sign up and log in to your Qblinks Cloud account.
-
Pairing your Qmote as following steps:
- Tap[+] in the bottom corner of the screen, and click your Qmote device to wake it up at the same time.
- Tap “Add“ to add Qmote to your smartphone.
- Select “Pair” in the pairing request.
- Pairing is complete! You can add more Qmote devices by following the same above steps.
- Choose the Qmote device you want to set up an Action for.
- Select your preferred click pattern.
- Choose the desired Action and complete detailed Action settings if further setting requests appear.
- Tap “SAVE” to save this Action.
- On the Qmote device page, tap Edit and choose the Qmote you wish to configure.
- You can rename Qmote (the default name is a serial number), adjust the response time, action feedback and find phone volume, check the device info, reset it or delete it.(Attention! Factory reset will erase all existing Actions on this Qmote, but Qmote will remain paired with your phones.)
- If you don't want this Qmote to be paired with a certain smartphone anymore, first go to the Qmote app and press Delete to clear the data on the app side, then go to phone's Bluetooth Settings to Forget it. (You have to perform both Delete and Forget to unpair Qmote completely.)
You have to slide the Qmote app notification to enable some Qmote actions, including Launch Apps, Send Current Location through SMS, Send SMS, Start Navigation, Speed Dial, and Uber actions.
* This problem arises from a systematic limitation of the iOS, and is currently unavoidable unless Apple releases the authority.
Android
- Sign up and log in to your Qblinks Cloud account.
-
Pairing your Qmote as following steps.
- Tap[+] in the bottom corner of the screen, and click your Qmote device to wake it up at the same time.
- Choose the Qmote device you want to add.
- Select “Pair” if a pairing request appears. Please note that a pairing request may not appear in some phone models.
- Pairing is complete! You can add more Qmote devices by following the same above steps.
- Choose the Qmote device you want to set up an Action for.
- Select your preferred click pattern.
- Choose the desired Action and complete detailed Action settings if further setting requests appear.
- Tap “SAVE” to save this Action.
- On the Qmote device page, press and hold the Qmote icon on the app to go to the edit page.
- You can rename Qmote (the default name is a serial number), adjust the response time, action feedback and find phone volume, check the device info, reset it or delete it.(Attention! Factory reset will erase all existing Actions on this Qmote, but Qmote will remain paired with your phones.)
- If you don't want this Qmote to be paired with a certain smartphone anymore, go to the Qmote app and press the delete icon in the upper right corner.
General Questions
iOS devices (running iOS 8 or newer) with Bluetooth Smart Ready.
Android devices (running version 5.0 or newer) with Bluetooth Smart Ready.
Android devices (running version 5.0 or newer) with Bluetooth Smart Ready.
Operating system:
PC running Windows 8 or newer
MacBook running OSX 10.9 or newer
Hardware requirement:
PC or MacBook should have Bluetooth 4.x support to run this mode.
PC running Windows 8 or newer
MacBook running OSX 10.9 or newer
Hardware requirement:
PC or MacBook should have Bluetooth 4.x support to run this mode.
Qmote is 100% made in Taiwan. Orders from Taiwan will be processed directly within Taiwan.
We have a warehouse in Santa Ana, CA, from which we ship all international orders including those within the US.
We have a warehouse in Santa Ana, CA, from which we ship all international orders including those within the US.
Please visit privacy_policy to see the Qblinks privacy policy.
Qmote comes with a one-year warranty starting from the date of purchase. Keep the enclosed warranty card in a safe place and produce the warranty card with the serial number when requesting a repair which is covered under warranty. Please visit
http://qmote.qblinks.com/warranty
for Qblinks warranty and return info. And you may contact
[email protected]
for such issues.
How Qmote Works
Qmote, the water-resistant Internet remote for smartphones, is an intuitive, single-button remote control which lets you activate all kinds of functions on your smartphone with predefined click patterns.
Qmote uses Bluetooth Low Energy 4.0 to connect to your phone, paring up easily and securely via the Qmote app.
Imagine Qmote as a Bluetooth shortcut to your phone. The functions your phone can do without the Internet are available for Qmote to trigger even when offline, while in any case where your phone itself requires the Internet to perform a function, Qmote needs it too.
For example, you don't need Internet access to turn on your phone's flashlight, but you need the Internet to control your home lighting (as through IFTTT). The logic is the same for both Qmote and your phone.
For example, you don't need Internet access to turn on your phone's flashlight, but you need the Internet to control your home lighting (as through IFTTT). The logic is the same for both Qmote and your phone.
Qmote can pair with up to 6 different smartphones, while each phone holds its own custom settings. That is, one click pattern on your Qmote can mean many different actions depending on which paired phone you currently have Qmote connected to.
Please note that due to the limitations imposed by Bluetooth protocol, a Qmote can "pair" with several smartphones, but can only "connect" to one phone at a time. Therefore, it is not possible to trigger an action on different phones simultaneously.
Please note that due to the limitations imposed by Bluetooth protocol, a Qmote can "pair" with several smartphones, but can only "connect" to one phone at a time. Therefore, it is not possible to trigger an action on different phones simultaneously.
Yes and yes! You may pair multiple Qmotes with one smartphone. Each Qmote can hold unique function settings when connected to the same phone. The Qmote app will help you with the pattern configuration and function management of all paired Qmotes.
For example, you can set the click pattern of "One short click" to "Turn on flashlight" on Qmote-A and to "Take a photo" on Qmote-B.
Please note that due to the limitations imposed by Bluetooth protocol, a smartphone can "pair" with several Qmotes simultaneously, but can only "connect" with up to 5 Qmotes at a time. (The exact number of Qmotes able to be connected with a smartphone can vary depending on different model of phones.)
First, pair Qmote with your computer. After that, simply connect Qmote to your computer (disconnect it from your phone if currently connected.) and it automatically becomes a handy presentation device, linking to your PC or Mac without any dongles or software drivers. In Presenter Mode, click once for the next slide and double-click for the previous one. (See:Supported Platform)
When you click your Qmote, a command is sent to the Qblinks Cloud which then passes the command to IFTTT/Zapier. Then, when IFTTT/Zapier recognizes this command through predefined settings in your IFTTT/Zapier account, an action is thus triggered. The whole route takes only seconds. Please refer to the app guide below for more info.
Qmote enters sleep mode to save power when there is no activity for a certain amount of time. Qmote uses a proprietary technology to determine the idle time based on the smartphone it connects to. You need to wake it up to perform some settings, e.g. response time change. The simplest way to wake it up is to click Qmote continuously, so only the Find Phone function will be triggered and no other action will be generated.
The beauty of Qmote is that you can use a single button to perform different actions by different click patterns. Please check the video of the click tempo for the multiple-click patterns. Please be aware, long-click does not exist until you create an action that uses a long-click pattern.
Qmote Hardware
Qmote’s dimensions are 46 (L) x 33 (W) x 5 (H) mm, and Qmote S’ are 39 (L) x 33 (W) x 5 (H) mm, both with a weight of only 6 grams, just about the same as a quarter.
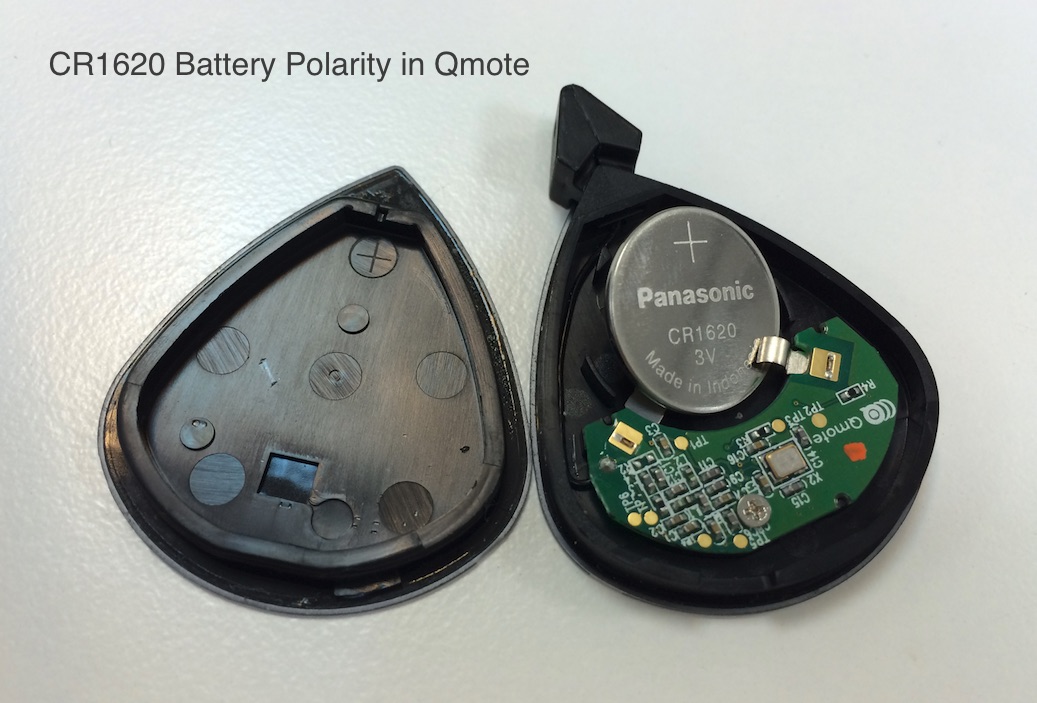
Qmote uses one replaceable CR1620 coin cell battery, which can last for up to a year with regular use.
- Insert a flathead screwdriver into the slot on the side and turn to open Qmote's cases. (Open with care! The rubber gasket which provides Qmote's water-resistance also makes it a bit difficult to open.)
- Replace the battery. Pay attention to its polarity.
- Carefully re-assemble the metal case, paying attention to the installation of the rubber gasket to ensure water-resistance.
-
Check to see if Qmote is functioning properly!
Approximately 30 meters (100 feet) under ideal conditions.
Qmote is IPX7-certified. And Qmote S is IP57-certified.
An IPX7-certified product should “withstand incidental exposure to water of up to 1 meter for up to 30 minutes,” but most suitable intended use includes indoor/outdoor scenarios in the presence of rain, snow, or brief splashes of water. Immersion is not recommended. Please note that once the Qmote case is opened (eg. for battery replacement), the rubber gasket must be properly re-assembled to ensure water-resistance.
An IP57-certified product offers everything that IPX7 promises, with limited dust ingress protection being the additional feature.
The peak force that the Qmote S strap hole can handle is about 12 lbs or 5.4 kg. The constant force it can handle is about at least 7 lbs or 3.2 kg. However, since Qmote S is such a compact device, it is not recommended using your Qmote S to support a heavy weight object.
When the connection between Qmote and the smartphone has been lost and the button is clicked, the LED will blink once and the last click pattern will be queued for 60 seconds. That is, if Qmote reconnects to the previous smartphone or to another paired phone in 60 seconds, the last click pattern will be sent and trigger the action on the connected smartphone. You may also refer to this
document
to see more info about Qmote’s blinking pattern.
Please visit
here
for Qmote's built-in features.
Qmote supports firmware OTA upgrade. First of all, you need to download the special app “Qmote Upgrade Tool” from
Google Play
or from
App Store
(Please note that Qmote Upgrade Tool on Android system only supports Qmote S). And perform the steps as follows:
- Delete Qmote, the one you’d like to perform OTA upgrade, from the Qmote App. For iOS system, you also have to go to "Settings>Bluetooth" to "Forget This Device" after deleting Qmote from the app side.
- Open the app "Qmote Upgrade Tool".
- Tap "Step.1" Then all nearby Qmotes should be listed, and you can choose the one you’d like to upgrade. This step is to make sure Qmote is connectable. DO NOT pair when a “Pairing Request” dialogue pops out. (If you accidentally click “pair,” please go to your phone’s Bluetooth Settings to Forget it before you try again.)
- Tap “Step.2” and choose the same Qmote.
- Tap “Step.3” and choose “Internal Image.” Then the multiple firmware versions will be listed. Please use the latest one according to its version number. If you’re upgrading a regular Qmote device, please select the item titled as “Regular Qmote” or “STD.” If you’re upgrading a Qmote maker’s module, please select the item titled as “Dev Board” or “Maker.”
- The upgrade process should begin automatically, and you will see the progress bar. Wait until 100% and you will get the latest version of Qmote!
Qmote App
- Sign up and log in to your Qblinks Cloud account.
-
Pairing your Qmote as following steps:
- Tap[+] in the bottom corner of the screen, and click your Qmote device to wake it up at the same time.
- Tap “Add“ to add Qmote to your smartphone.
- Select “Pair” in the pairing request.
- Pairing is complete! You can add more Qmote devices by following the same above steps.
- On the Qmote device page, tap Edit and choose the Qmote you wish to configure.
- You can rename Qmote (the default name is a serial number), adjust the response time, action feedback and find phone volume, check the device info, reset it or delete it.(Attention! Factory reset will erase all existing Actions on this Qmote, but Qmote will remain paired with your phones.)
- If you don't want this Qmote to be paired with a certain smartphone anymore, first go to the Qmote app and press Delete to clear the data on the app side, then go to phone's Bluetooth Settings to Forget it. (You have to perform both Delete and Forget to unpair Qmote completely.)
- Choose the Qmote device you want to set up an Action for.
- Select your preferred click pattern.
- Choose the desired Action and complete detailed Action settings if further setting requests appear.
- Tap “SAVE” to save this Action.
- Choose the Action you want to edit.
- Tap the edit icon to alter the setting details of this Action, and tap "SAVE" when you are done editing.
- You can also delete, pause or resume to paly this Action by tapping the icons nearby.
- Please make sure you have an IFTTT account. (It's not the same as from the one you registered on Qblinks Cloud) If not, you may sign up on IFTTT official website or by its mobile app "IF". (We recommend you to download the "IF" app for easier configuration.)
- Activate the channel "Qblinks Qmote" on IFTTT to authorize IFTTT to access your Qblinks Cloud account.
- Create an IFTTT action in the Qmote app by following the standard procedure. (See: How to create an action?)
- Switch to IFTTT website or app. Create a "Recipe" on IFTTT.
- Choose "Qblinks Qmote" as the trigger channel.
- Choose "Press button" as the trigger.
- Select the correct Qmote (if you have multiple) and the correct click pattern. The Qmote name and the click pattern should correspond to what you have set on the Qmote app side.
- Assign the action you wish to correspond to the pattern.
- Once the recipe has successfully been created, you can click Qmote using the specific click pattern to test if the action you chose on IFTTT works like it should. (Internet access is required when using an "IFTTT action.")
The "IFTTT action" you set in the Qmote app will become a "Trigger" on IFTTT. This "Trigger" will lead to an "Action" via IFTTT, and this "Action" is what you really want to accomplish, such as smart home control. (See: How does an "IFTTT action" or "Zapier action" work?)
- Please make sure you have an Zapier account. (It's not the same as the one you registered on Qblinks Cloud) If not, you may sign up on Zapier official website.
- Create a Zapier action in the Qmote app by following the standard procedure. (See: How to create an action?)
- Click "Make a New Zap."
- Search "Qblinks Qmote" and choose it as the trigger app. Use "Press button" as the trigger.
- Click "Connect a New Account." Login Qblinks Cloud in the pop-up window to authorize Zapier to access Qblinks Cloud.
- Select the correct Qmote (if you have multiple) and the correct click pattern. The Qmote name and the click pattern should correspond to what you have set on the Qmote app side.
- Assign the action you wish to correspond to the pattern.
- Once the Zap has successfully been created, you can click Qmote using the specific click pattern to test if the action you chose on Zapier works like it should. (Internet access is required when using an "Zapier action.")
The “Zapier action” you set in the Qmote app will become a “Trigger app” on Zapier. This “Trigger” will lead to an “action app” via Zapier, and this “action” is what you really want to accomplish, such as smart home control. (See: How does an “IFTTT action” or “Zapier action” work?)
When you trigger an IFTTT action, Qblinks Cloud will notify IFTTT in the shortest time possible. And the Qmote App offers an easy way for you to check if IFTTT takes the command. Tap " Integrations>IFTTT" to see your log.

Qmote App
- Sign up and log in to your Qblinks Cloud account.
-
Pairing your Qmote as following steps.
- Tap[+] in the bottom corner of the screen, and click your Qmote device to wake it up at the same time.
- Choose the Qmote device you want to add.
- Select “Pair” if a pairing request appears. Please note that a pairing request may not appear in some phone models.
- Pairing is complete! You can add more Qmote devices by following the same above steps.
- On the Qmote device page, press and hold the Qmote icon on the app to go to the edit page.
- You can rename Qmote (the default name is a serial number), adjust the response time, action feedback and find phone volume, check the device info, reset it or delete it.(Attention! Factory reset will erase all existing Actions on this Qmote, but Qmote will remain paired with your phones.)
- If you don't want this Qmote to be paired with a certain smartphone anymore, go to the Qmote app and press the delete icon in the upper right corner.
- Choose the Qmote device you want to set up an Action for.
- Select your preferred click pattern.
- Choose the desired Action and complete detailed Action settings if further setting requests appear.
- Tap “SAVE” to save this Action.
- Choose the Action you want to edit.
- Tap the edit icon to alter the setting details of this Action, and tap "SAVE" when you are done editing.
- You can also delete, pause or resume to paly this Action by tapping the icons nearby.
- Please make sure you have an IFTTT account. (It's not the same as from the one you registered on Qblinks Cloud) If not, you may sign up on IFTTT official website or by its mobile app "IF". (We recommend you to download "IF" app for easier configuration.)
- Activate the channel "Qblinks Qmote" on IFTTT to authorize IFTTT to access your Qblinks Cloud account.
- Create an IFTTT action in the Qmote app by following the standard procedure. (See: How to create an action?)
- Switch to IFTTT website or app. Create a "Recipe" on IFTTT.
- Choose "Qblinks Qmote" as the trigger channel.
- Choose "Press button" as the trigger.
- Select the correct Qmote (if you have multiple) and the correct click pattern. The Qmote name and the click pattern should correspond to what you have set on the Qmote app side.
- Assign the action you wish to correspond to the pattern.
- Once the recipe has successfully been created, you can click Qmote using the specific click pattern to test if the action you chose on IFTTT works like it should. (Internet access is required when using an "IFTTT action.")
"IFTTT action" you set in the Qmote app will become a "Trigger" on IFTTT. This "Trigger" will lead to an "Action" via IFTTT, and this "Action" is what you really want to accomplish, such as smart home control. (See: How does an "IFTTT action" or "Zapier action" work?)
- Please make sure you have an Zapier account. (It's not the same as the one you registered on Qblinks Cloud) If not, you may sign up on Zapier official website.
- Create a Zapier action in the Qmote app by following the standard procedure. (See: How to create an action?)
- Click "Make a New Zap."
- Search "Qblinks Qmote" and choose it as the trigger app. Use "Press button" as the trigger.
- Click "Connect a New Account." Login Qblinks Cloud in the pop-up window to authorize Zapier to access Qblinks Cloud.
- Select the correct Qmote (if you have multiple) and the correct click pattern. The Qmote name and the click pattern should correspond to what you have set on the Qmote app side.
- Assign the action you wish to correspond to the pattern.
- Once the Zap has successfully been created, you can click Qmote using the specific click pattern to test if the action you chose on Zapier works like it should. (Internet access is required when using an "Zapier action.")
The “Zapier action” you set in the Qmote app will become a “Trigger app” on Zapier. This “Trigger” will lead to an “action app” via Zapier, and this “action” is what you really want to accomplish, such as smart home control. (See: How does an “IFTTT action” or “Zapier action” work?)
When you trigger an IFTTT action, Qblinks Cloud will notify IFTTT in the shortest time possible. And the Qmote App offers an easy way for you to check if IFTTT takes the command. Tap " Integrations>IFTTT" to see your log.
Troubleshooting
The LED of Qmote blinks only when it is not connected with any phone. Please disable the Bluetooth of all nearby phones that have ever been paired with this Qmote. Click Qmote and check if you can see the LED blinking. If you are sure the Qmote is not connected with any phone and you don't see the LED blinking, it could be the battery problem. Please be aware, most people don't see the LED blinking because the Qmote is connected with the other phone that has been paired before without being unpaired. To know where the LED is, please check the other FAQ item,
Where is Qmote's LED and why is it blinking?"
- You may turn off the Bluetooth on your smartphone and then turn it back on again to see if reconnecting helps. Or you may refer to the "Total factory reset" below.
-
Special notice for Sony Xperia Users
The Bluetooth Low Energy implementation on Sony Xperia requires much shorter real-time response from the BLE device. And if a Qmote deivce pairs with multiple phones, it slows down the response time. Therefore, if you pair Qmote with multiple phones, one of which is an Xperia phone, you may experience frequent connection difficulty.
To solve this, you will also have to perform "Total Factory Reset" to clear all the paring keys stored in Qmote. And please ensure that your Xperia phone is the first device that Qmote pairs with after "Total factory reset".
Due to the limitations of the BLE chip, each Qmote can only pair with up to 6 smartphones or computers. The 7th paired device, even if pairing is successful, will have limited function. Undertake "Total factory reset" to release this storage.
-
Delete the Qmote which you want to undertake Total Factory Reset. If you don't know how to delete a Qmote,
Please refer to
"Edit a Qmote"
Please refer to "Edit a Qmote" - Click Qmote 10 times in quick succession (short clicks), and then hold the 11th click for at least 5 seconds until you see the LED blinks quickly for 3 times.
- Turn off the Bluetooth toggle on your phone and then turn it back on again.
- Restart the Qmote app and add your Qmote back onto the app's device list.
*Once you perform Total Factory Reset, Qmote will forget all the smartphones it used to be paired with.
Please refer to the pattern log here:
https://qcloud.qblinks.com/pattern_log
(You can also reach this log from the Qmote app.)
You are able to track the command from your clicks on Qmote to where it went wrong, so you will be able to determine whether it was the Qblinks Cloud, IFTTT, or another cloud service that failed to deliver the command. You are welcome to report any problems related to the Qblinks Cloud here: https://github.com/qblinks/QMOTE_Bugs_Suggestions_Report/issues.
You are able to track the command from your clicks on Qmote to where it went wrong, so you will be able to determine whether it was the Qblinks Cloud, IFTTT, or another cloud service that failed to deliver the command. You are welcome to report any problems related to the Qblinks Cloud here: https://github.com/qblinks/QMOTE_Bugs_Suggestions_Report/issues.
Please visit our GitHub repository:
https://github.com/qblinks/QMOTE_Bugs_Suggestions_Report/issues
Thank you very much for helping us improve!
Thank you very much for helping us improve!
iOS
For the iOS users, there is no more missing keyboard issue since the firmware version 2.15. If you experienced this problem, please upgrade your Qmote firmware to the latest version. For more information, please check the section
Firmware OTA Upgrade.
With the action of camera shutter and snooze, Qmote works like your iOS's side key, the volume keys. If you trigger those actions outside the camera app or without the alarm buzzing, this Qmote action will be interpreted as a simple volume control.
Android
For the Android users, there is no more missing keyboard issue if you are using the latest Qmote app. If you experienced this problem, please make sure your Qmote app is the latest version, unpair your Qmote, and pair it with the new app again.
Alarm Snooze is supported only in Android 6.x or later.
Location Service needs to be enabled for BLE Scanning on an Android phone. You can turn it off after adding Qmote.
Qblinks Cloud
You may use a single Qblinks Cloud account on multiple phones, for example, for yourself and for your spouse. You might wonder how that works with IFTTT. The following are different possible scenarios.
-
Same Qmote with different Qblinks accounts:
Qmote 1 + Phone 1 (login as Account 1) and Qmote 1 + Phone 2 (login as Account 2) are treated as two different Qmote. The two phones hold their respective configurations, including regular Actions and IFTTT actions. -
Same Qmote, same Qblinks account on different phones:
- If you rename Qmote on Phone 1, its name displayed on IFTTT will be updated, but its name on Phone 2 will remain the same unless you manually rename it, too. (Qmote name on IFTTT will be updated every time you rename Qmote, no matter you rename it on Phone 1 or 2, so please be careful to enter exactly the same name on Phone 1 and 2 to keep its name synced on IFTTT.)
-
Same Qmote, same Qblinks account with different IFTTT accounts:
- The IFTTT click pattern you create on the Qmote App will be shown on all IFTTT accounts with the same connected Qblinks account.
- If the click pattern is triggered, all recipes with that pattern in all IFTTT accounts will be enabled.
Once you hit "Remove all Qmotes”, the following things will happen.
The only reason you want to do “Remove all Qmotes” is that you no longer have access to your Qmote, and you want to remove it from the 3rd party platform(i.e. IFTTT, Muzzley,Zapier).
- All Qmote devices include settings will be removed from both Qblinks Cloud account and Qmote app.
- Since all synced Qmotes are gone and therefore all triggers on 3rd party could such as IFTTT, Zapier, and/or Muzzley are no longer valid until you re-add your Qmote from Qmote App. to reconnect Qblinks Qmote channel on IFTTT if you want it resume to work.
The only reason you want to do “Remove all Qmotes” is that you no longer have access to your Qmote, and you want to remove it from the 3rd party platform(i.e. IFTTT, Muzzley,Zapier).
If you believe someone else is using your Qblinks account, or you have ever given your Qblinks account to someone else and you have no control over it, the right way to proceed the account revocation is to:
- Change the password of your Qblinks account.
- Disconnect third party platform from integration page.
- Hit Remove all Qmotes.
Compliance